Authorizing the payment for a payment transaction using Apple Pay using the Transpayrent UI Helper SDK requires the following simple steps:
- Create a Payment Session from the back-end and render the payment page
- Include the dependencies for the Transpayrent SDK, Transpayrent UI Helper SDK and Apple Pay Javascript client
- Implement the following Transpayrent UI Helper SDK methods to return the necessary data constructs to the Transpayrent SDK:
- Instantiate the Transpayrent SDK and Transpayrent UI Helper SDK
- Display the Buy with Apple Pay button using the Transpayrent SDK's displayPaymentButton method
- Fulfill the order upon receiving the 620021 - Payment Successfully Authorized notification
Important
Transpayrent has complete support for Split Payment (Card + Miles for an Airline, Card + Loyalty Points or Card + Voucher for a Webshop etc.) and the amount in the notification may therefore be equal to or less than the total amount for the order.
The Order shouldn't be considered paid until the Sum of the Payment Transaction(s) equal the total amount for the Payment Session.
It is strongly recommended to implement validation of the amount before fulfilling the order.
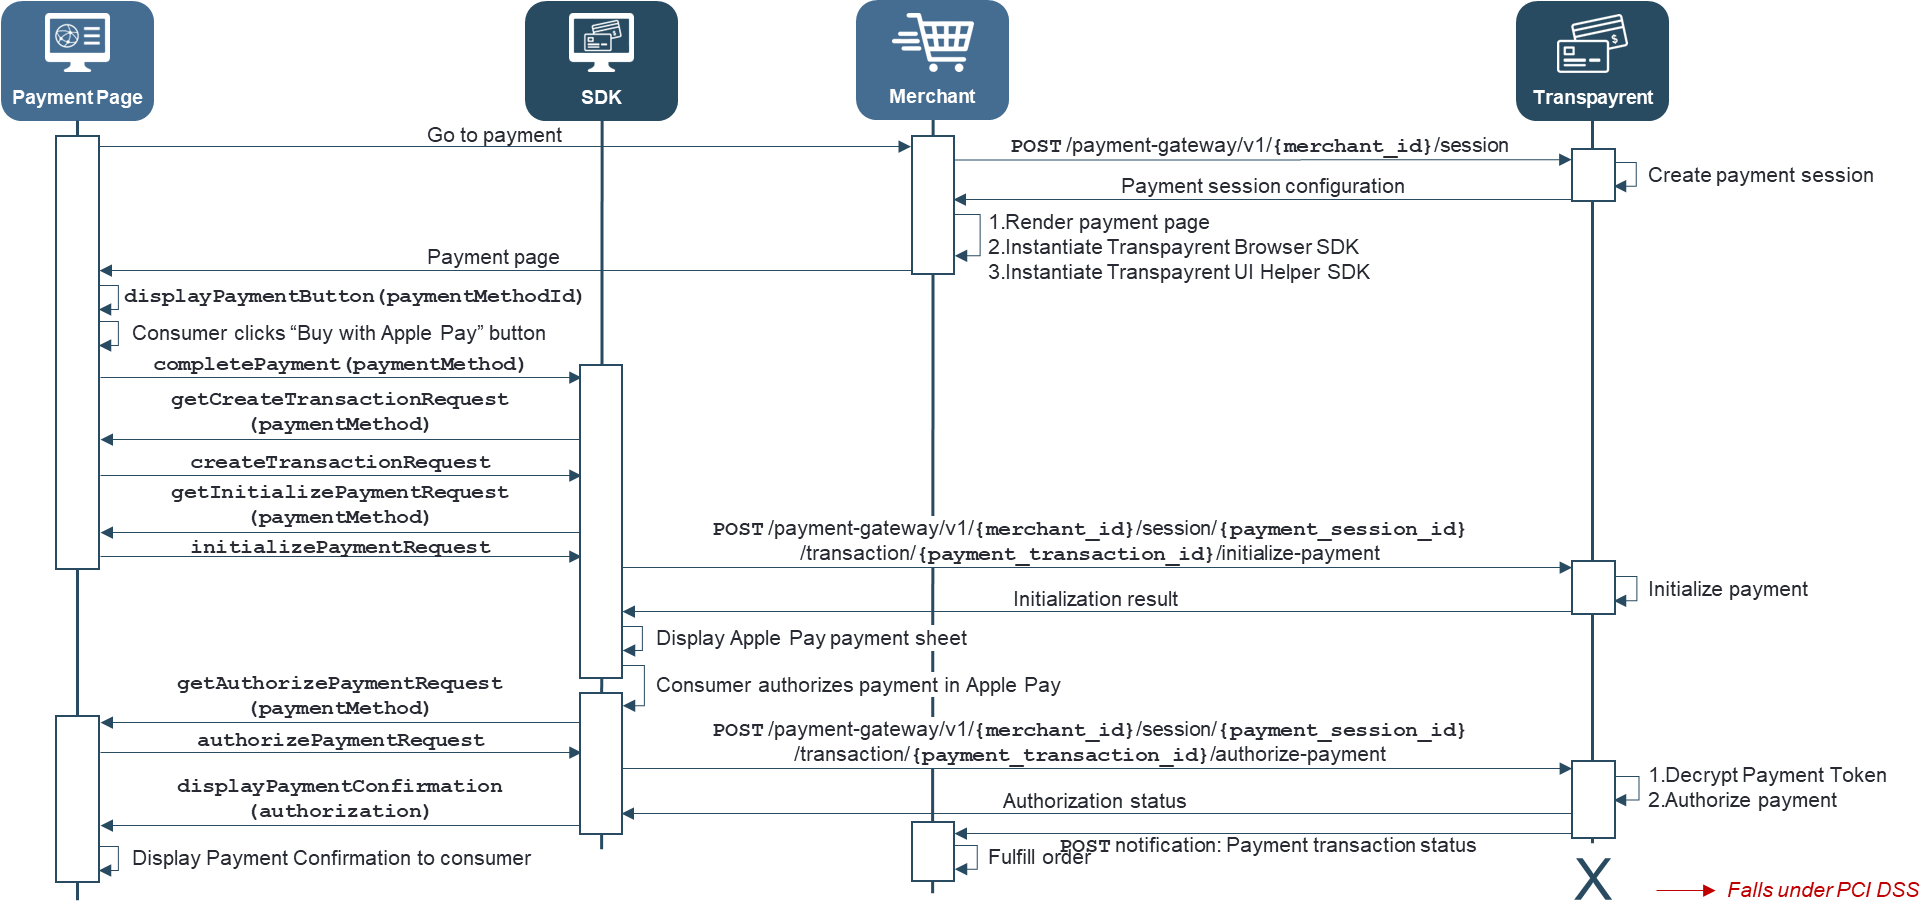
The sequence diagram below illustrates the complete flow for authorizing the payment for a payment transaction with Apple Pay using the Transpayrent SDK:
Please contact Transpayrent to enable payments using Apple Pay.
Preparing Merchant Domain for Verification
Apple Pay for Web requires ownership verification for the website domain.
Verifying ownership requires placing Transpayrent's domain verification file on the website under: /.well-known/apple-developer-merchantid-domain-association
Please refer to Preparing Merchant Domains for Verification for further details.
Include the dependencies for the Transpayrent SDK and Apple Pay Javascript client
The Transpayrent UI Helper SDK uses the Transpayrent SDK to securely communicate with Transpayrent's Payment Gateway, which in turn relies on the swagger-js client library. For Apple Pay the Transpayrent SDKs also relies on Apple Pay Javascript client.
The code snippet below illustrates how to include the necessary dependencies for both the Transpayrent SDK and the Transpayrent UI Helper SDK
<script src="https://storage.googleapis.com/static.[ENVIRONMENT].transpayrent.cloud/v1/swagger-client.js"></script>
<script src="https://storage.googleapis.com/static.[ENVIRONMENT].transpayrent.cloud/v1/transpayrent.js"></script>
<script crossorigin src="https://applepay.cdn-apple.com/jsapi/1.latest/apple-pay-sdk.js"></script>
Implement the Transpayrent UI Helper SDK's callback methods to return the necessary data constructs to the Transpayrent SDK
The Transpayrent UI Helper SDK relies on callbacks to the payment page to retrieve the data required by the Transpayrent SDK to communicate with Transpayrent's Payment Gateway.
The code snippet below illustrates how the payment page may implement the necessary methods required to complete a payment with Apple Pay:
<script>
    /* ========== COMMON DATA START ========== */
    var email = 'hello@transpayrent.dk';
    var nationalIdentificationNumber = '31892554313';
    /* ========== COMMON DATA END ========== */

    /* ========== CREATE PAYMENT TRANSACTION DATA START ========== */
    var createTransactionRequests = new Array();
    // Apple Pay
    createTransactionRequests[204] = { correlation_id : 'TP-'+ transpayrentConfig.sessionId,
                                       amount: { currency : 208,          // DKK
                                                 value : 100 } };
    /* ========== CREATE PAYMENT TRANSACTION DATA END ========== */

    /* ========== INITIALIZE PAYMENT DATA START ========== */
    var initializePaymentRequests = new Array();
    // Apple Pay
    initializePaymentRequests[204] = { payment_method_id : 204,
                                       save : false }           // Optional
    /* ========== INITIALIZE PAYMENT DATA END ========== */

    /* ========== AUTHORIZE PAYMENT DATA START ========== */
    // Apple Pay
    authorizePaymentRequests[204] = { payment_details : { payment_method_id : 204,
                                                          token : null },
                                      national_identification_number : nationalIdentificationNumber,    // Optional: Required in Brazil
                                      contact : { email : email },  // Optional: Required in Brazil
                                      installments : 2 };           // Optional: 2 - 12
    /* ========== AUTHORIZE PAYMENT DATA END ========== */

    /* ========== SAVE PAYMENT DETAILS START ========== */
    var saveRequests = new Array();
    // Apple Pay
    saveRequests[204] = { payment_details : authorizePaymentRequests[204].payment_details,
                          consumer_id : 'CID-12345',
                          name : 'My Apple Pay Card' }
    /* ========== SAVE PAYMENT DETAILS END ========== */

    /* ========== IMPLEMENT TRANSPAYRENT UI HELPER SDK METHODS START ========== */
    TranspayrentUIHelper.prototype.displayPaymentConfirmation = function (authorization) {
        this._sdk.getLocalizedMessage(`Payment transaction: ${authorization.transaction_id} successfully authorized`)
            .then(text => {
                if (this._container) {
                    this._container.style.visibility = 'hidden';
                }
                var message = document.createElement('h1');
                message.className = 'success';
                message.innerHTML = '<img id="loader" src="/success.png" width="30" height="30" alt="- completed -" />';
                message.innerHTML += ` ${text}`;
                document.body.appendChild(message);
            });

    }
    // Override UI Helper SDK methods to return the correct request for the specified payment method
    TranspayrentUIHelper.prototype.getCreateTransactionRequest = function (paymentMethodId) {
        return createTransactionRequests[paymentMethodId];
    }
    TranspayrentUIHelper.prototype.getInitializePaymentRequest = function (paymentMethodId) {
        return initializePaymentRequests[paymentMethodId];
    }
    TranspayrentUIHelper.prototype.getAuthorizePaymentRequest = function (paymentMethodId) {
        return authorizePaymentRequests[paymentMethodId];
    }
    TranspayrentUIHelper.prototype.getSaveRequest = function (paymentMethodId) {
        return saveRequests[paymentMethodId];
    }
    /* ========== IMPLEMENT TRANSPAYRENT UI HELPER SDK METHODS END ========== */
</script>
Instantiate the Transpayrent SDK and Transpayrent UI Helper SDK
The Transpayrent UI Helper SDK uses the Transpayrent SDK to securely communicate with Transpayrent's Payment Gateway, which in turn must be instantiated with the payment session data returned by the Create Payment Session API.
The code snippet below illustrates how to instantiate both SDKs with the necessary data:
<script>
    // SDK configuration
    const transpayrentConfig = {
        merchantId: [UNIQUE MERCHANT ID ASSIGNED BY TRANSPAYRENT],
        sessionId: [ID IN THE RESPONSE FROM "Create Payment Session"],
        accessToken: '[x-transpayrent-access-token HTTP HEADER IN THE RESPONSE FROM "Create Payment Session"]'
    };
    const url = 'https://generator.[ENVIRONMENT].transpayrent.cloud/v1/'+ transpayrentConfig.merchantId +'/system/PAYMENT_GATEWAY/sdk/CLIENT';

    // Instantiate SDK and UI Helper SDK
    const sdk = new Transpayrent(url, transpayrentConfig);
    const helper = new TranspayrentUIHelper(sdk, document.getElementById('container'), document.getElementById('loader') );
</script>
Display the Buy with Apple Pay button
The Transpayrent SDK uses the Apple Pay Javascript client to control payments made with Apple Pay while seamlessly supporting complete customization of the Buy with Apple Pay button.
The payment sheet for Apple Pay will automatically be displayed upon the consumer clicking the Buy with Apple Pay button using the Transpayrent SDK's displayPaymentSheet method after which the Transpayrent UI Helper SDK's completePayment method will be invoked.
The code snippet below illustrates how to display the Buy with Apple Pay button with basic customizations:
<script>
    /* ========== DISPLAY BUY WITH APPLE PAY BUTTON START ========== */
    // Display the Payment Sheet for Apple Pay
    // See: https://developer.apple.com/documentation/apple_pay_on_the_web/applepaybutton
    var config = { buttonstyle : 'black',
                   type : 'pay',
                   locale : 'en',
                   onClick : () => {
                        const paymentMethodId = 204;    // Apple Pay
                        var data = { merchant_id : transpayrentConfig.merchantId,
                                     merchant_name : '[MY MERCHANT]',
                                     country : 208,
                                     payment_method_ids : Array.from(paymentMethods.keys() ),
                                     amount : createTransactionRequests[paymentMethodId].amount,
                                     save : initializePaymentRequests[paymentMethodId].save };
                        sdk.displayPaymentSheet(paymentMethodId, data)
                            .then(token => helper.completePayment(paymentMethodId, data.save) )
                            .catch(reason => {
                                document.getElementById('container').style.visibility = 'hidden';
                                alert('API: '+ reason.api +' failed with HTTP Status Code: '+ reason.status +' and error: '+ reason.messages[0].message +'('+ reason.messages[0].code +')');
                            });
                    } };
    // Display the "Buy with Apple Pay" button
    sdk.displayPaymentButton(204, document.getElementById('container'), Array.from(paymentMethods.keys() ), config);
    /* ========== DISPLAY BUY WITH APPLE PAY BUTTON END ========== */
</script>
The Transpayrent SDK provides a helper method to retrieve Transpayrent's status message for the specified status code